HEADS UP - Some links on Breeze Around The World are affiliate links. This means if you choose to make a purchase through one of the links I provided, I may earn a small commission at no extra cost to you. These earning help me keep the blog going, thank you for your support!
I spent 3 days camping on Ururpukapuka Island in 2025 and I’ve put together this full camping guide to help you do the same! Most people don’t travel to New Zealand for a tropical beach getaway. But if you are able to travel north to the subtropical “Bay of Islands,” then you can treat yourself to a tropical experience.
Make sure you stick around until the end for my top 5 tips for an epic camping adventure!
Table of Contents
ToggleAbout the Bay of Islands
The two main towns in the bay of islands are the smaller, quieter Russel and the more lively Pihia. However I believe that the true gem of the bay of islands lies just beyond the coastline in the actual islands themselves. I
think it should be a priority of your trip to get out to the islands.
However you choose to divy up your time in the area, it’s inevitable you will spend time in either Russel or Paihia or both. Keep reading for details on how to get to Russel and Paihia and what to do once you’re there!
About Urupukapuka Island
First of all how do you pronounce Urupukapuka? And what even is a Puka? This island still has it’s Maori name, “urupukapuka” meaning island with many puka, which is a tree. I was so embarrassed to try to pronounce it, but now it’s one of my favorite places to talk about because I love the way the word sounds! It’s VERY phonetic: er-a-puka-puka. Hopefully that makes sense and you pronounce it with confidence!
Urupukapuka is one of over 100 islands in the bay of islands and is known for feeling the most tropical.
The caveat being that if you’ve been to a “true” tropical destination you’ll need to adjust your expectations. Don’t expect bathtub temperature water, hundreds of schools of colorful fish or coconuts littering the sidewalk. But what you can count on is quaint, quiet streets, warm sand in between your toes and enjoyable swimming water.
I’m one of those people who LOVES a cold dip in the sea and I’m happy to swim in more “temperate” water. But truly the temperature of the water in the bay of islands was perfect during the January days we were there. Not too hot, not too cold, a real goldilocks of swimming conditions. AND I know this to be true because my partner thoroughly enjoyed snorkeling and swimming there and he has zero tolerance for cold water swimming.
How to Get to Paihia
This is always the biggest question I have when planning a trip. Okay yeah that spot looks nice but how do I get there? The bay of islands region is 156 miles (252km) north of Auckland.
Your best bet is to explore the area by car. If you’re arriving from the Auckland airport, you can easily rent a car right at the terminal.
From Auckland, the drive up to the Bay of Islands is lovely. It’s about a 4 hour drive and there’s lots of options for stopping and taking in the view along the way!
You can also get to the Bay of Islands by bus! I’d recommend the Intercity Bus as it’s the main bus system connecting all the far away towns in the country. It’ll cost ya about $56 NZD ($33 USD), although the price varies seasonally and on high traffic days. As far as I can tell you can’t bus directly from Auckland to Russel, only Paihia.
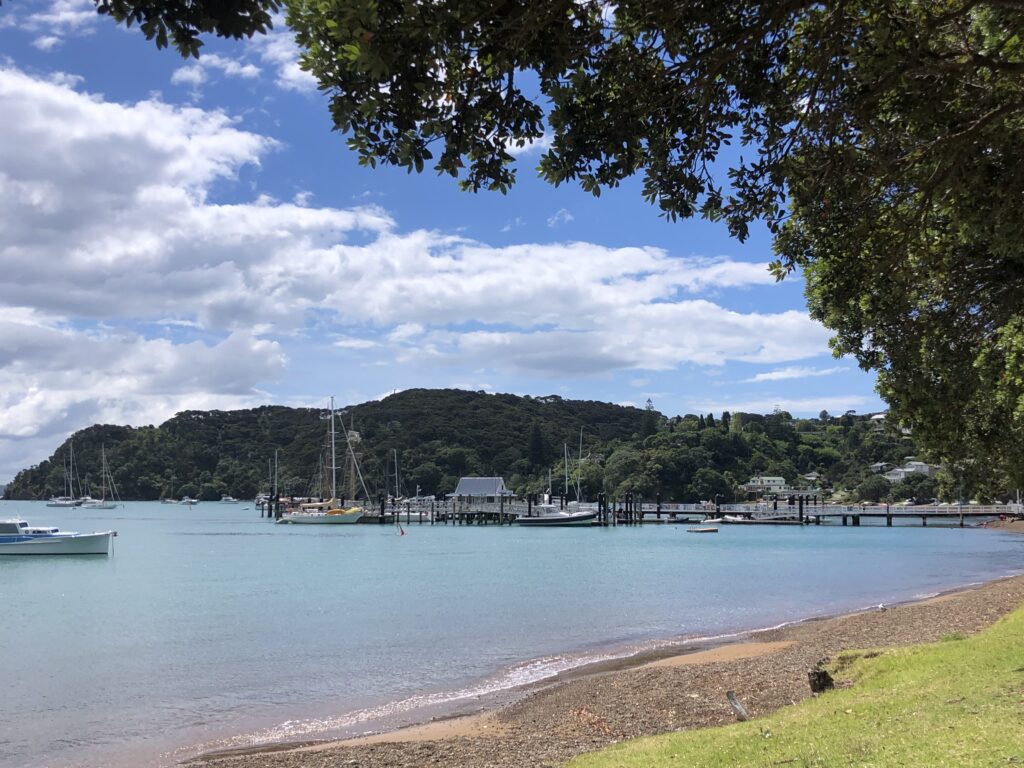
Once you’re in either Paihia or Russel you can catch a relatively fast ferry out to the islands and you may even see some wildlife along the way!
Tips for Visiting Paihia
Unless you’re really working hard to get off the beaten path, Paihia will be your main jumping off point for all things Bay of Islands. We actually did things a bit in reverse and ended our time in Paihia, whereas most people start there. I thought the town was, cute, artsy, surfy and sunny! I don’t really think you can go wrong with a visit there, even just walking around was entertaining enough.
We stayed one night at the Haka House hostel which I honestly thought was a bit overpriced and hard to find. Our dorm beds were around $50 USD!! Which is on the high end even for NZ.
If you’re staying there you can find free street parking up the road, then you’ll walk through a little shopping complex filled with trendy eateries, bars and dive shops, find the stairwell and go up a few flights, all to get to reception. Once I was in the general area there was fine signage but I was a bit directionally challenged up until that point.
Most of the hostels in this area are able to hook you up with options to explore the islands! Whether you are interested in a dive trip, snorkel excursion, boat trip, beach time ect they have all the excursion packages you could dream of. In order to get out to the prime ocean spots you really do have to get on a boat and get out to the islands. We had our own snorkels and I tried to find a local spot in both Russel and Paihia to snorkel at and couldn’t really find anything just off the beach.
While we are typically a “buy groceries and cook” type of hostel goer, we did opt to go out to eat. There seemed to be a solid range of dine out options based on a variety of budgets. We went to Greens Thai Cuisine , which just so happened to be next door to Greens Indian Cuisine. Our meals were about $22 NZD which thanks to the awesome exchange rate at the time (in January of 2025 $1 NZD = $0.56 USD) felt very budget core.
How to Get to Urupukapuka Island
You’ll need to take a ferry out to the island. We booked our ferry from the town of Russel rather than Paihia because that’s where we were that day. It costs the same to get out to Urupukapuka Island regardless of which port you leave from. You’ll want to take the Otehei bay ferry as it will drop you at Otehei bay on Urupukapuka island.
The ferry leaves from downtown Russel, it wasn’t too hard to find as there is just one little pier in the town! There are a number of boats coming in and out but the crew is very helpful at making sure you’re getting on the right boat.
We spent an afternoon in Russel (mostly figuring out where to park) before our 5pm ferry. If you have a car that you need to leave for overnight parking, there’s a free parking off Pitt Street by the library. We were also told we could park at the school because it was summer break still.
We excitedly waited and ate our PB&J sandwiches, which, at this point, Nate had grown quite tired of. There’s really only one small and expensive grocery store in town, so do your best to stock up prior to arriving.
As the boarding time drew near, we got increasingly more nervous. Despite it still being the middle of summer we were the only ones waiting on the dock! Were we in the wrong place? Was everyone else planning on arriving right at boarding time? We paced and looked out at the horizon. “That’s gotta be the ferry!” A big sleek catamaran pulled up and docked. The “explore” ferry logo plastered on the side. Surely that’s our boat, but we were the only 2 people on the dock. How could that be?!
The deckhand asked “Bree and Nate? Ferry to Otehei bay!” We laughed…. “Uhh do you know it’s us because we’re the only ones on the manifest?” Yep, as it turns out we were the only 2 people catching the boat out to Urupukapuka island that night.
Most people just go out to the island for the day, so catching the last boat of the night out there just doesn’t make sense for them. And sure enough when we got to the beautiful dock on the island, there was a huge queue of people waiting to get on! Whereas we rolled off the boat with our backpacks packed and a huge jug of water.

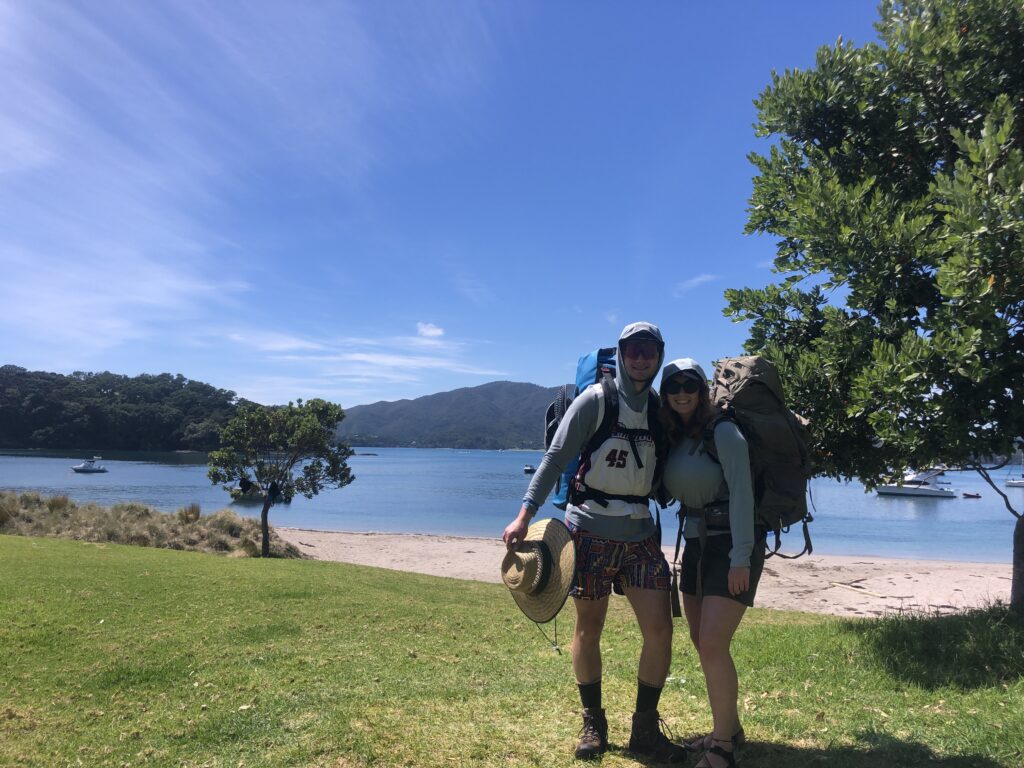
Camping on Urupukapuka island
I thought camping on Urupukapuka island would be confusing and hard but it was the opposite. After we took the $65 NZD ferry we had a short 15 minute walk to Urupukapuka bay campsite. There are 3 campsites on the island (Urupukapuka bay, cable bay and sunset bay) and you’ll need to prepay for your spot.
Cost
You’ll want to reserve these campsites on the Department of Conservations website, otherwise there’s a $10 nzd fee to pay in person. The price per person ranges from $15 – $20 nzd depending on the time of year. The rangers do come around and check that you’ve paid! If you don’t have your registration number they can look your reservation up for you.
Water
We brought 2 big jugs of bottled water although we did find there was a water spigot at the campground. Most people will tell you the water is safe to drink anywhere in New Zealand, but we almost always filter ours, especially if there’s livestock around which there is on the island. There was also a handy shower spigot so we were able to have a fresh water rinse after a dip in the sea!

Cooking dinner
Things to do on Urupukapuka Island
For a secluded campground on an island there were actually a ton of things to do. The island is so beautiful and with minimal effort you can get away from the crowds.
Snorkeling
First and foremost is going for a swim! You can rent snorkels from Otehei bay, and while this certainly wasn’t the best snorkeling I’ve ever done, it’s always exciting to peek your head underwater and see a whole new world. I can pretty much be entertained just looking at the sand moving in the surf.
You can snorkel off any beach on the island, we went on the other side of the island at a beach near Te Hoanga point. During our hour snorkeling we saw: bat rays, parrot fish, wrasse, sea urchins, snappers and a few other species I couldn’t identify. Again, not the most amazing knock your socks of snorkeling but truly a good time! My friend is also an ocean nerd and when she took herself snorkeling at Cable Bay she saw the biggest octopus she’d ever seen!
Hiking
Urupukapuka island has a number of lovely trails so you really can get anywhere on the island. We decided to hike the trail that would take us in a full loop around the island. It was the perfect amount of challenging and rewarding and we had incredible island views. The trail was very well maintained when we did it in Jan of 2025. Just make sure to start the day with lots of water because there’s nowhere on the trail to refill!
Dining
Otehei bay does have a small restaurant and little handmade goods shop if you fancy a burger or locally made earrings. At Otehei bay you can also rent snorkeling gear and kayaks. You can also resupply on sunscreen, trust me make sure you bring enough. You’ll need to be extra diligent about sun protection in the Bay of Islands. I actually got sunburned through my shade tarp with sunscreen on. UV protectant clothing is the way to go here for sure!
Stargazing
Finally if you’re camping make sure to take a look at the stars while you’re out there! Nate woke up the first night and said the stars were amazing, so you know the next night I set an alarm to get up at midnight! And boy oh boy that was one crisp and beautiful and clear night sky. Luckily the island is pretty far away from any major light source and while it’s not an official dark sky reserve I bet it’s as good as one.
5 Tips for Camping on Urupukapuka Island
- Book your campsite in advance and bring proof of your booking (they will check!)
- Brings lots of fresh drinking water!
- Load up on snacks and food as there’s nowhere to resupply on the island
- Bring cash if you’d like anything from the locals shop
- Stay up on a clear night to stargaze!
So…. are you ready to camp on Urupukapuka Island? Pick up a tent from the thrift store, purchase your ferry tickets and get out to New Zealands hidden subtropical climate!
Even if camping isn’t in your New Zealand itinerary, I truly hope you can make it out to the Bay of Islands during your time in here. There’s nowhere else like it in the country!
Prices reflect the January 2025 USD to NZD exchange rate
Bree is a hobby travel writer who specializes in backpacking guides and ocean based travel. She’s worked in marine based tourism in Alaska and in ocean outdoor education on Catalina Island. She is currently living with her partner in New Zealand where she is working and backpacking.

Ahoy! I’m Bree and I’ve started this blog to help you plan your next great outdoor adventure. With a background in marine science, I’ve got an aptitude for all things ocean, but you’ll find land based adventures here too! Everything you see here is based on my own travel experience and paid for myself. I hope you stick around!
Great article!!!!
So helpful!! I planned my trip based on this and loved it.
Comments are closed.