HEADS UP - Some links on Breeze Around The World are affiliate links. This means if you choose to make a purchase through one of the links I provided, I may earn a small commission at no extra cost to you. These earning help me keep the blog going, thank you for your support!
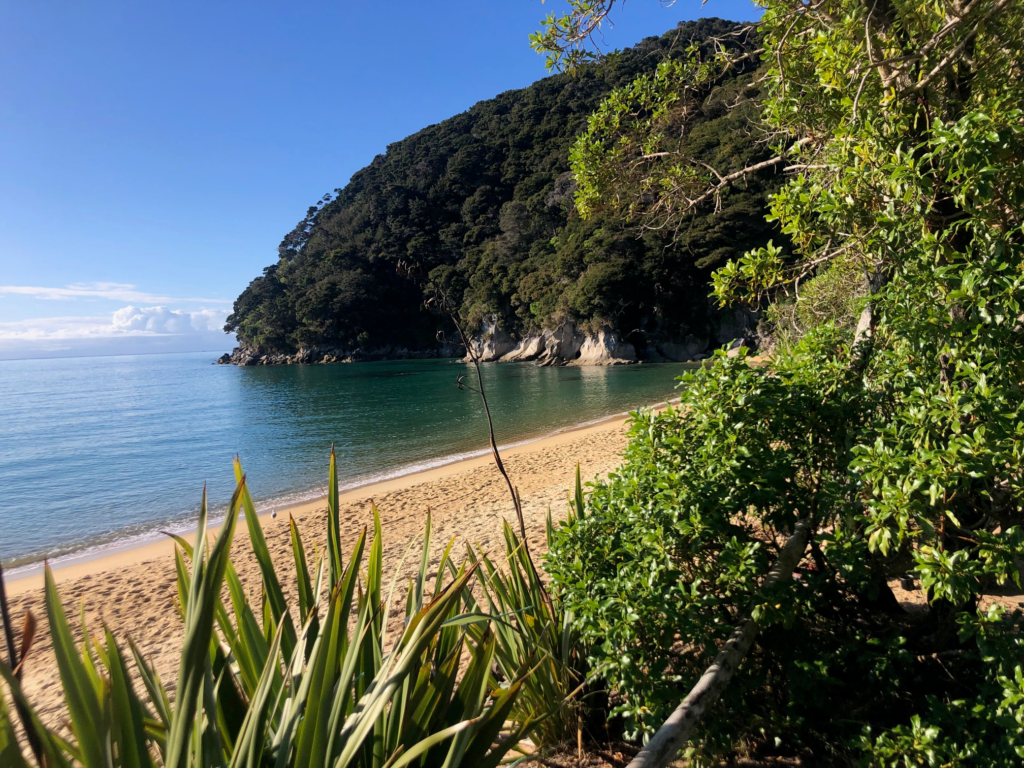
Abel Tasman National Park is a beautiful coastal park that boasts over 40 miles of hiking and walking trails. Not to mention it is home to one of New Zealands 10 great walks.
If you’re preparing to hike the Abel Tasman great walk – I’ve got you covered! I hiked the trail in 4 days and have put together this guide to help you do the same.
Read my complete guide or jump around to a section that suits you using the table to contents:
Table of Contents
ToggleWhere is the Abel Tasman great walk?
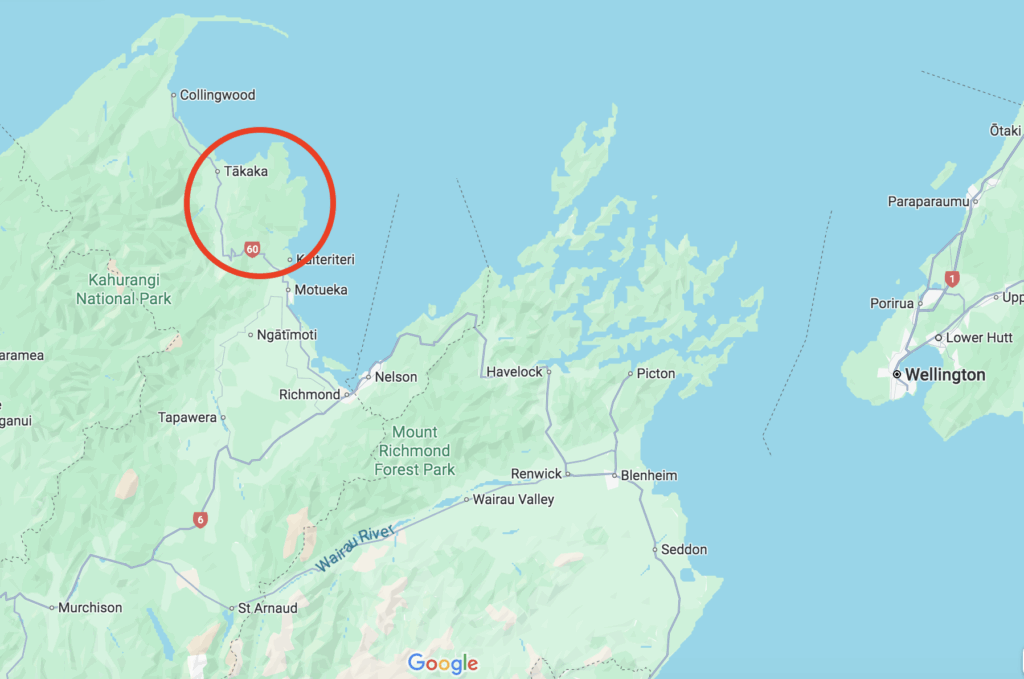
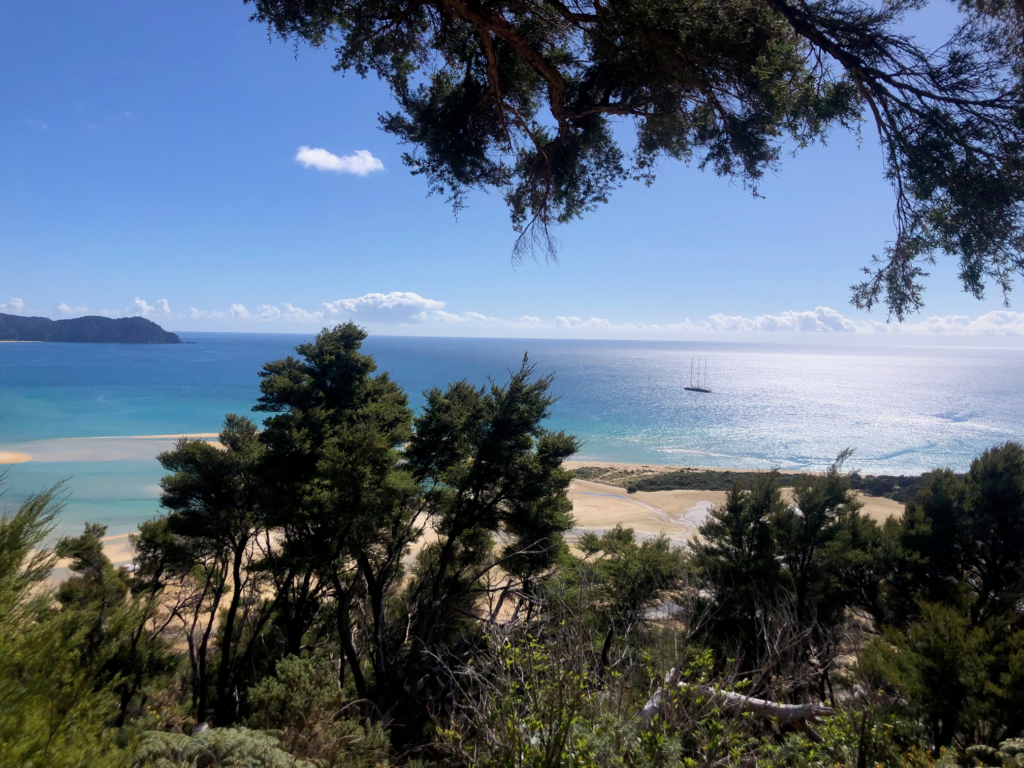
Located on the south island of New Zealand, Abel Tasman National Park is unlike anything else in the area! It boasts white sandy beaches that stretch on for ages, clear lagoon like waters, canopy trees and rolling trails. The start of the Abel Tasman great walk in Marahau is just an hour drive from Nelson, 3 hours from Picton (where the ferry to the north island is) and 6 hours from Christchurch.
Abel Tasman national park is actually the smallest national park in New Zealand. The first time I visited New Zealand (in 2022 before my 2025 working holiday visa) I never even made it out here. I heard about the Abel Tasman great walk and thought it looked cool, but I had no idea where to start if I wanted to actually hike the thing.
Now here I am, living in Richmond (just 45 minutes from the start of the track) and I’ve been up to the national park half a dozen times, day hiked, kayaked and of course done the Abel Tasman great walk.
Where to Stay the Night Before
The Abel Tasman great walk starts in Marahau and ends either in Totaranui or in Wainui Bay (depending on if you do the official loop at the end). But accommodations in both places are limited! There are 2 camp/cabin lodging options in Marahau (The Barn and Marahau Beach Camp) which I’ve driven by a number of times and both look cute, clean and affordable! There’s pretty much nothing on the Wainui Bay side of things that is backpacker friendly unless you drive 30 minutes to Takaka.
For an abundance of options in various price ranges, your best bet will be to stay in Nelson proper or the neighboring town of Richmond. For a budget option, the hostel I’ve heard the best things about is Tasman Bay Backpackers.
I’ve stayed at the cute and quaint Grand Arden Hotel in Nelson and I honestly had a lovely time there!
Of course staying in Nelson means you’ll have to get yourself over to the park the morning you want to start the Abel Tasman great walk. Unfortunately public transportation is limited…
How to Get to the Abel Tasman great walk
If you have a car or are renting a car, you’re in luck! Driving up to Abel Tasman is super easy! You’ll drive from Nelson out through the cute town of Motueka (stop at Toad Hall or the Smoking Barrel for a pre or post trip meal) and then through farmlands and into the national park.
If you’re relying on public transportation, unfortunately there are limited options to get out to the start of the track. The only provider is better bus which offers daily transportation fro Nelson to Marahau and the two other neighboring towns of Motueka and Kaiterteri. They operate during the Able Tasman great walk season of Oct – April.
If you’re the adventurous type, hitch hiking is always an option!
When to Hike the Abel Tasman Track
It’s important to know that the official great walk season as dubbed by New Zealand’s department of conservation (DOC) is from October – April. This is the late spring, summer and early fall! While you’ll likely want to plan your walk for this window of time, the Tasman region is a more temperate climate and a winter walk is totally doable.
Unlike some of the other tracks, the Abel Tasman great walk is located right next to the ocean, which regulates the climate. You also won’t hike above 520 ft / 160 m, so there’s no snowy alpine section in the winter.
But don’t be fooled, the area can experience high amounts of winter rain which can flood out sections of the track. And while it’s right next to the ocean, its no tropical winter getaway. Temperatures can be below freezing at night and near freezing during the day June – Aug.
Be Aware
There are a few things you’ll need to plan for specifically for the Abel Tasman great walk: the tidal crossings and the water taxi.
Tidal Crossing
This trek is pretty cruisey and straight forward once you’re on the track, there are a few things to be aware of.
There is one major tidal crossing on this track, and another smaller tidal crossing you may encounter.
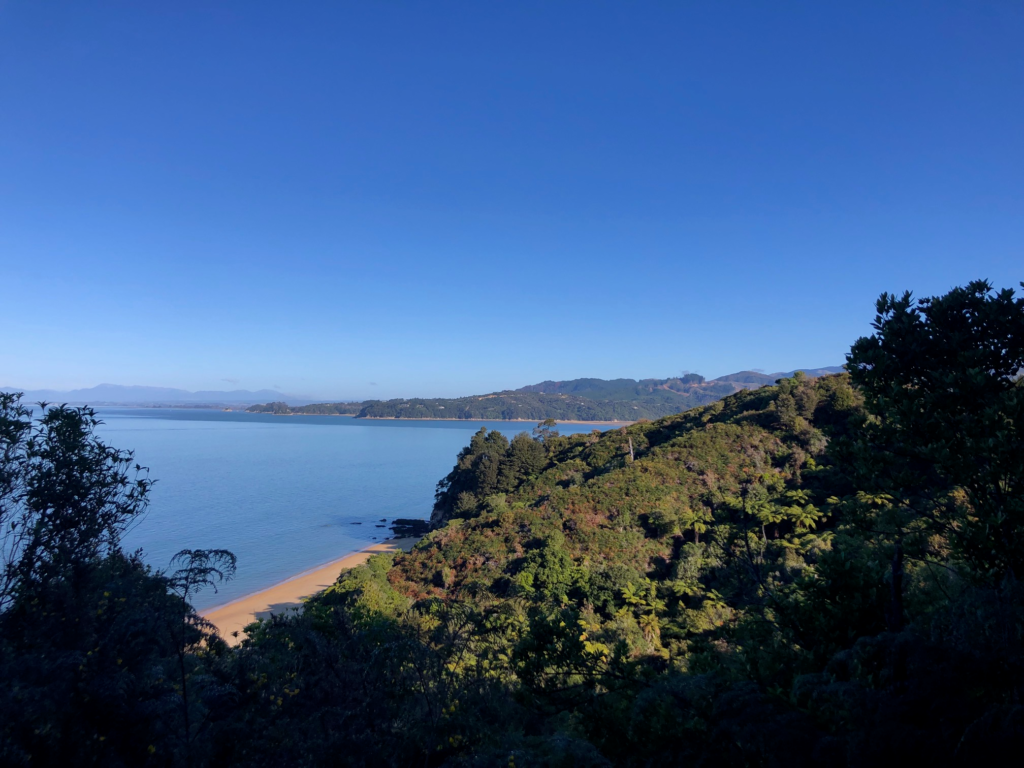
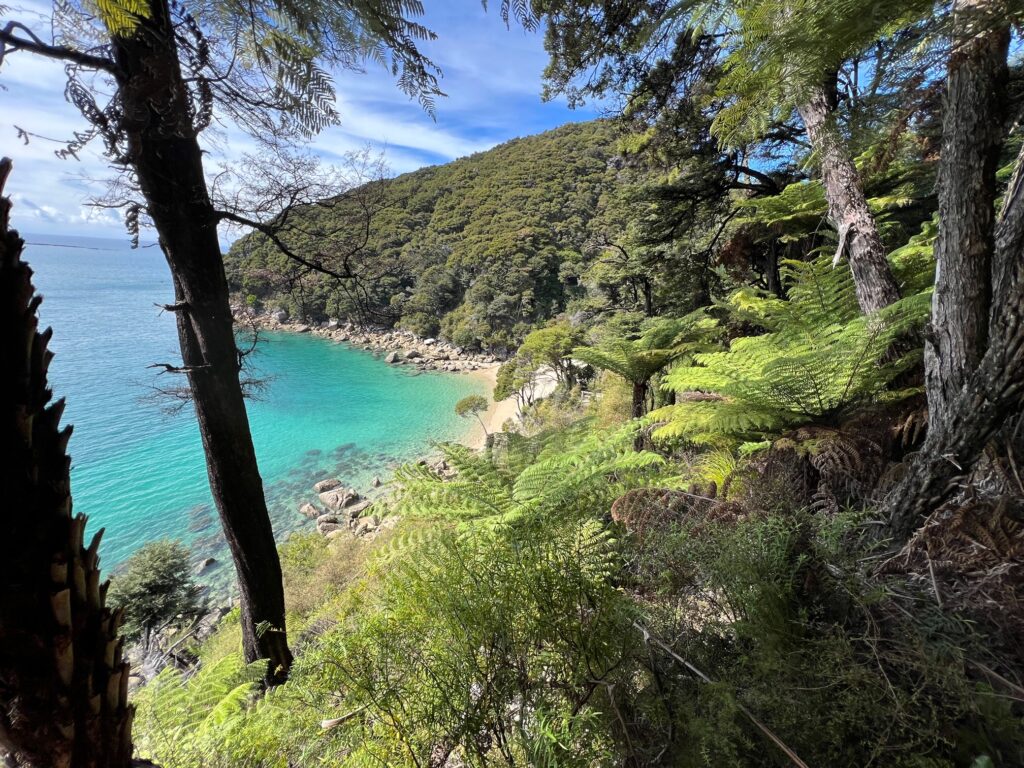
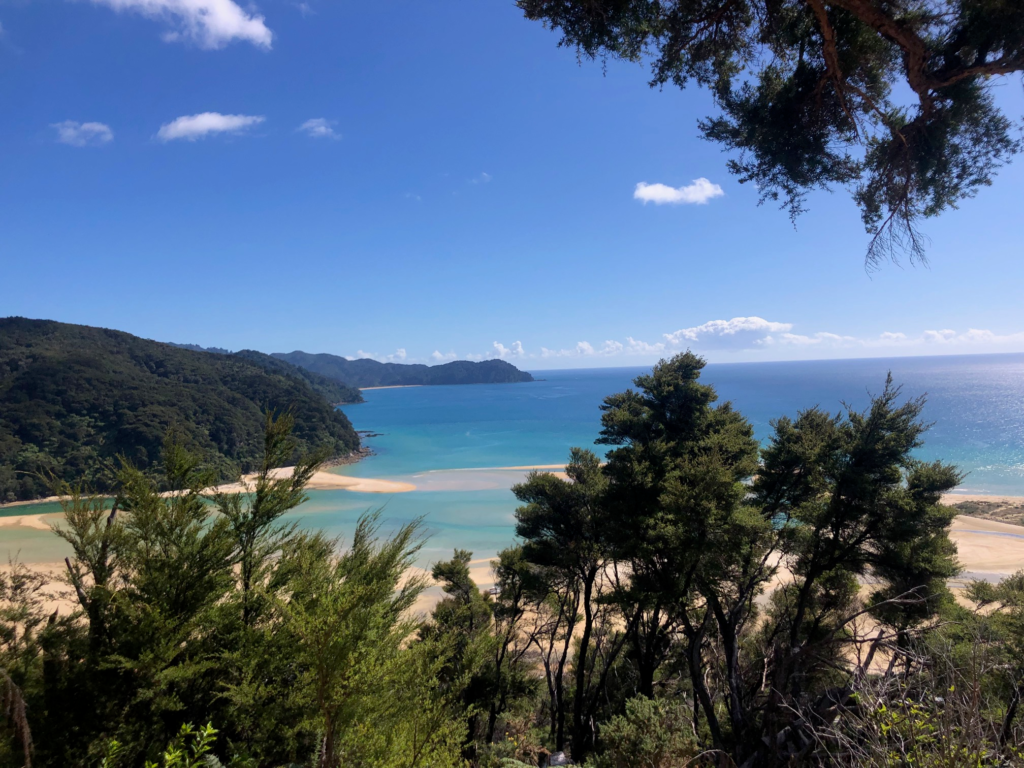
The Abel Tasman great walk takes you along a beautiful coastal route. You will follow the curves of the bays with the natural coast line. Some of the bays are quite large and have big mud flats at the back, which the track crosses through…. But only at low tide. If you miss the low tide window, you’ll either have to hike around or wait for the next low tide.
I’ll go into the details of the tidal crossing in the next section of this guide, which is about the route.
Water Taxi
You’ll also need to book a water taxi to get from one end of the track to another. The Abel Tasman great walk is not a looped track so if you’ve parked your car in Marahau (or arranged other transport from there), you’ll need to arrange a water taxi to take you back to the start.
It also important to know that the water taxi will only pick you up as far north as Totaranui. This is where I had my major confusion when planning my route. You see, to hike from Marahau to Totaranui is only 27.6 of the 37.25 mile track.
What I didn’t realize is that there’s an additional 10 mi (16 km) section of the trail past Totaranui to reach the official end in Wainui Bay.
But the confusing part is, there’s no good transportation option from Wainui Bay back to Marahau. There is public transport from Wainui to Takaka, which is a slightly bigger town. Most people hike back along “Gibbs Hill” to reach Totaranui where the water taxi is, creating a nice loop.
When I planned this route I didn’t even realize that by getting picked up in Totaranui and not hiking onwards I was leaving out a section of the track. I’ve made peace with this – maybe one day I’ll go back and do those extra 10 miles!
Anyways – the water taxi I used and recommend is Abel Tasman AquaTaxi. It cost $60 NZD ($35 usd) per person.
Abel Tasman Great Walk Route
This is the most coustomizable great walk route I’ve seen! The full track is 37 mi (60km) point to point. Although most people opt to stop at the 27 mi mark where the water taxi will collect you in Totaranui.

There are 18 campsite (wowza!!) and 4 huts along the track. If you’re camping (like we did) the route is incredibly customizable. If you’re staying in the huts, the DOC has positioned them a days hike apart so everything is all planned out for you. To read the DOC recommended Abel Tasman great walk route (which only includes huts no camping) click here.
Our 4 day Route
My partner Nate and I opted to camp along the track, which saved us money and allowed us to have a custom hiking route. We also decided we wanted to kayak a portion of the route! Kayaking is something we love to do a unique to this great walk, so it was worth the $165 NZD kayak rental. This is the route we decided on…
Day 1
Yay! You’re on the Abel Tasman great walk!
Marahau carpark to Anchorage bay by kayak. Then we hiked to Torrent Bay. In total: 3 miles kayaking, 3 miles hiking
This was such a fun day! We opted to kayak to Anchorage Bay rather than hike the 7 miles. I’ve since hiked this section and it’s lovely. It’s about a 4 hr hike but we did it in just 2 hrs kayaking. We then got our bags dropped off to us and hiked on the Torrent Bay to camp.
Note there is a tidal crossing which we missed here. During low tide you can walk about 20 minutes across a mud flat to reach Torrent Bay. We hiked 1.5 hours around the bay during high tide.
Day 2
Torrent Bay to Onetahuti Bay, 7.5 mi (12 km)
Lots of rolling up and downs all throughout this trek and today is no exception. But the views are great!
Day 3
Onetahuti Bay to Waiharakeke Bay, 7.5 mi (12km)
Big tidal crossing at Awaroa Bay that you won’t want to miss! Make sure to time it right, you can cross within 2 hours of either side of the tide.
Day 4
Waiharakeke Bay to Totaranui Bay, 2 mi (3.2 km) water taxi back to Marahau
We gave ourselves a small little hike for our last day! We wanted to catch an early water taxi, but also wanted to have a bit of a hike so we camped just 2 miles down the trail at Waiharakeke Bay. You can also camp right at Totaranui Bay where the water taxi will pick you up.
If we were going to add a 5th day we would have camped at Totaranui Bay on night 3 and then on day 4 hiked to Whariwharangi campsite for night 4. Then for our 5th and final day we would have hiked 3 hours back over Gibbs hill to return to Totaranui for our water taxi pick up.
Since we missed out on that last little loop, we’re planning on going up there for a 1 night trip to see what we missed out on!

Huts Vs. Camping
Abel Tasman has beautiful, well maintained huts… from what I could tell on the outside. I’ve stayed in my fair share of great walk huts so I can tell you they probably have a nice cooking area with gas in season, a fireplace, running water, bunk rooms with mattresses and toilets. The Anchorage Bay site actually had flushing toilets! Wow!
If you’ve never stayed in a hut before, just know that you need to bring all your own gear and you’ll be sleeping right next to other hikers! While they do have mattresses they don’t have any of the other gear (don’t even count on a pot to cook with) and they also lack privacy.
All the huts on this trek are $84 nzd ($50 USD) for international trampers and during the great walk season.
If you fancy saving a bit of money and carrying a bit more gear, you can camp all along this route at any of the 18 campsites. You will still need to reserve and pay for a spot. Campsites are charged per person not per tent, and it’s $31 nzd ($18 usd) for international campers.
At the campsites you’ll find a water spigot and compostable toilets. And far fewer people.
Note about the water – while most kiwis will tell you the waters fine to drink, the DOC does recommend you purify your water in some way. To save on fuel and time we like to filter ours rather than boil it, and we use a Sawyer filter.

How to Book a Great Walk
Once you’ve nailed down if you’ll be hutting, camping, or a little bit of both, you’ll need to book your bunk/campsite through the DOC. The great walks book out super far in advance, so try to secure your spot as early as possible.
Head over to the DOC booking website

Food Inspiration
Backpacking food is one of my favorite things to talk about and one of my favorite things to plan for. While it can sometimes be stressful I always want to make sure I’m fueling my body right on these trips!
For more backpacking food ideas, tips and tricks, check out my backpacking meal series.
I eat a vegetarian diet but I did eat some fish on this trip, and Nate eats it all! Below you’ll find our meals for 4(ish) days of hiking.
Breakfast | Lunch | Snacks | Dinner |
Rice and eggs pre trail | Spring Rolls | Mixed nuts OSM bars | Chickpea bolognese Beef bologenese |
Protien oats with peanut butter | Tuna and ramen | Date bars Mixed nuts Apple chips | Mac and cheese Carbanara |
Protien oats with peanut butter | Tuna and ramen | OSM bars Fruit leather | Chickpea / Beef bologenese |
Protien oats with peanut butter | Post hike, snacks we left in the car | OSM bars Fruit leather | Post hike |
We ate our classic protein oats (1 cup dry oats, protein powder, cranberries) but added peanut butter this time! Boy oh boy did it make this breakfast so much better! No hate to oatmeal, but the PB added some extra fats, flavors and protein to the meal. We just packed a plastic tupperware with PB.
Day 1 of the Abel Tasman great walk we packed spring rolls which were so yummy! For the other lunches we kept it simple and did ramen with packaged tuna. For backpacking we buy the “foil” packets rather than canned tuna to save on weight. I also cold soak my ramen after making breakfast so that it’s ready during lunch and I don’t have to boil water.
This was the first trip that Nate and I decided we wanted to try dehydrating our own food for. We made both a beef and chickpea bolognese and dehydrated them in our oven for 12 hours. We were excited and nervous for the experiment! We added the dehydrated sauce to couscous and sealed it all up in a ziplock bag. And you know what…. It totally worked like a charm!!
Cost to hike the Abel Tasman Great Walk
So how much did this 4 day trek cost us? I’ve done the per person cost breakdown in NZD below! Note that because it’s per person I’ve split things like the $165 kayak rental in two
Accomodation
$93 campsites
Transportation
$82.5 kayak
$40 bag relocation from Marahau to Anchorage Bay
$60 water taxi
Food
$60
Safety
$0 register intentions at adventuresmart.nz
Also together the Abel Tasman great walk cost me $335.5 NZD or $198 USD.
While we did save a lot of money ($50/night) by camping, we did rent the kayak which cost us. And there was a surprise fee to relocate our bags because they didn’t fit inside the kayak…. Opps! It didn’t occur to me that my big backpacking bag would need to fit into the kayak! Regardless, I wouldn’t change a thing!

What It's Like to Hike Abel Tasman
What’s it actually like to hike on this trail? Well for starters it’s beautiful, and if you love the beach you’re in luck! We could see the ocean almost every step of the way. But I must say, now that I’ve gotten a taste for alpine hiking, I was a little underwhelmed by this great walk.
I would do it again and absolutely recommend it to people, but I felt like the track was essentially the same all 4 days. I’d heard from a fellow tramper that this was one of the hardest great walks… which was just not the case for me.
I think the grind some people experience during this track comes from the relentless up and down of the hills as you go into the woods and back down to the beach over and over (and over). Personally I didn’t mind the gradient of the track, but it just got a bit repetitive.
With that being said, these were the best campsites ever because they were right by the beach! Finish a hard days walk and then strip down and go for a dip in the sea! The beaches were truly amazing and the forrest was lush.
It was also really special to get to kayak on this track as part of our Abel Tasman great walk experience. Our first day was a bit windy and the seas weren’t flat calm which had the kayak rental team prepping us for what seemed like an all out storm. But for Nate and I having lived and worked in Alaska, the 15 knot winds and 2 foot seas were nothing! We bravely paddled into the wind having agreed that if it got to gnarly we would make for the nearest beach.
Thankfully, it didn’t come to that! We got to enjoy the coastline from the water and made it all the way to Anchorage Bay in 2 hours. We hauled the kayaks up on the beach and sat to enjoy lunch of spring rolls. What a treat! Unfortunately the weka bird is quite bold and use to people in this area… the brave wild bird was eyeing my meal the whole time I was eating. I had half a spring roll left in my lap when the weka jumped into my lap, grabbed the spring roll and bolted into the brush! I never even saw it because I was turned talking to Nate! Crafty little bird!
This was only the beginning of our bird troubles….
From Anchorage Bay we needed to walk on to Torrent Bay where we would camp. There is a tidal crossing here which if timed properly only takes 20 minutes to walk across the mud flat to Torrent Bay. We, unfortunately, were there at high tide and had to walk the 3 mi / 5km around the back of the bay. But it was a welcomed walk as we’d just been sitting in a kayak for the morning.
And what do you know, there was a little side trail to Cleopatras pool! Sounded enticing and we were in no rush so we hiked the 25 minute side trail to find a beautiful set of pools damed up along the river. If you’re hiking by this portion of the trail make sure to go check out the pools!
But be ware of the duck.
There we were soaking our feet in a pool along the river when I decided to get all the way in. We’d been there about 20 minutes with no ducks in sight, but the second my shoulders hit the water that duck FLEW at me. I got the message and headed out but it followed me up the river bank! And across the river. And down the trail. For 40 minutes.
It followed Nate and I down the trail for 0.6 mi / 1 km until Nate finally sent me ahead to get out of sight, because for some reason the duck was particularly aggravated by my presence. Just when I thought I lost sweet Nathan forever, he came bounding down the trail all smiles and we raced away, jumpy at even the slightest bird call.
It wasn’t much longer that we came upon our campsite. Because we were there in late March and there are so many campsites, it really felt like we had the place to ourselves. Well, besides the ducks of course. Turns out that is a known and particularly territorial whio (pronounced “fee-o”) duck, which is actually an endangered endemic species. Honestly good for the whio for defending it’s ground!

Day 2: We woke up at Torrent Bay and went about our business packing up. On the way out we stumbled through a bunch of houses, almost like a very small neighborhood in a very very small town. Weird, we thought. As it turns out, these would not be the last traces of infrastructure in the park. There are several of these little boat-in or even some drive-to neighborhoods within the national park. They were all there before the land became a national park and thus were grandfathered in.
Like I said, most of this trail feels all the same and the days sort of blend together. There are a few sections where you walk on the beach, lots of up and downs over hills (nothing more than 600ft) and great ocean views the whole way. After a couple hours of walking we made it to Onetahuti Bay for our second night of camping.
Day 3: This is the bigggg tidal crossing day at Awaroa Bay! Make sure to check the tide chart before you embark on your trip. You should know what time low tide is that day (there are 2 low tides during a 24 hour period) and aim to cross with 2 hours of either side of low. We woke up knowing our window to cross was between 12:30 – 4:30 pm.
We didn’t have very far to hike, so we took our time in the morning and still made it to the crossing early. We weren’t 100% sure where the crossing was, so we walked over to the hut because we figured we could ask around. We didn’t even have to ask because near the hut was a big, tall, orange trail marker. And straight across the 1/4 mile bay was an identical one marking where the trail picked back up.
We took off our shoes and waited with the other hikers.
Once it looked decent enough to cross we squished and squashed our way to the other side. It was pretty fun feeling the mud in-between our toes! This is certainly a great walk experience unique to Able Tasman.
After the crossing we had a short walk to Waiharakeke Bay which was our favorite campsite! This was also our favorite beach as it seemingly went on forever and there was practically no one else there.
Day 4: I don’t even know if you could call this a “day 4” because we gave ourselves such an easy day! The water taxi we booked was at 11am so we left our campsite at 9ish and got to Totaranui by 10:30. We enjoyed even more swimming and beach time (but mind the sand flys) until the water taxi arrived! We considered this a paid for boat tour of the park and soaked in the hour ride back to Marahau.
This was one of my favorite parts… at Marahau a tractor drives out onto the beach to trailer the boat back to the parking lot. And you just get to sit in the boat the whole time! So there we were sitting a in boat getting trailered up the beach and down the road!

Thanks for reading my full guide and review of the Able Tasman Great Walk.
For booking info make sure to head over to New Zealand’s DOC website. Remember that the great walks can book far out in advance during the summer season. So plan your dates and routes early, pack your bag and grab some bug spray!
I hope you’re able to use this complete guide to tailor your Abel Tasman great walk experience.
Ahoy! I’m Bree and I’ve started this blog to help you plan your next great outdoor adventure. With a background in marine science, I’ve got an aptitude for all things ocean, but you’ll find land based adventures here too! Everything you see here is based on my own travel experience and paid for myself. I hope you stick around!